Loading....

Saturday, July 25, 2009

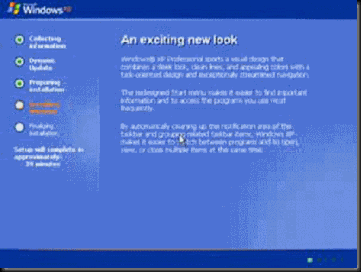
New Style Setup Billboards Background

how to change Setup Screen

One of the most common ways of editing the setup billboard is to remove that blue background. It can be replaced by almost any

image.
clip_image002

The Setup Billboards are displayed during setup, obviously. Since the advent of Windows XP, there are two different stles however.

The Classic and the New.

The New Style Setup Billboards are present in Windows XP and

Windows 2003. I'll be going through on how to change various aspects of

the file, including changing images and fonts.

The New Style Billboards allow loads of customizations. Read below to find out what this guide will cover.

The first thing I'll cover is changing the Blue or Silver backgrounds of the billboards. We can replace it with

anything we want, and give setup our own feel. This may be useful for companies who want to brand their setups.

Next will be changing the remaining images, such as the Bullets and Windows logo in the upper Left.

Changing the text without any visual help can seem daunting. Luckily visual help is what you'll find here. Each

string of text has a picture associated with it, as well as a slideshow to illustrate its position during the setup

process.

Colors Colors Colors. After all the other customizations, the colors may no longer work with the new images. Let's

change that.

I'll be using Restorator 2007 or ResEdit, so go download it yourself, and we can get started.

and save the extracted WINNTBBU.DLL file to a temp directory. Always use the

same file version as that of your Windows version. Don't use a SP1 file for a SP2 OS basically.

WINNTBBU.DLL file in your I386 directory.

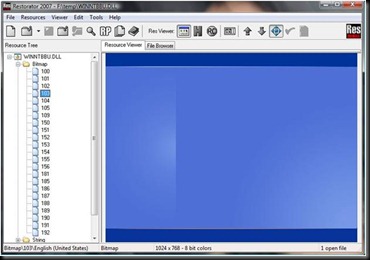
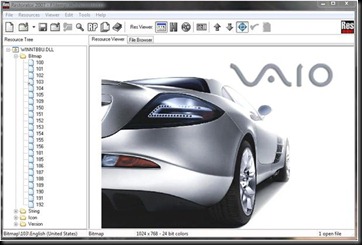
Open the WINNTBBU.DLL using Restorator 2007 or ResEdit.


clip_image004

Open up WINNTBBU.DLL in your resource editor, and select the image you wish to replace. Look below for a table of the

corresponding resource numbers and descriptions.

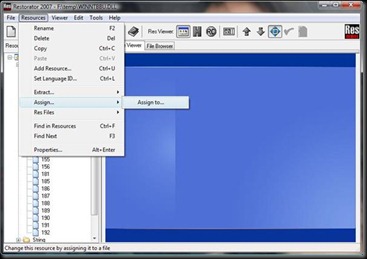
Once you have the bitmap resource selected, click the resourceà Assign..--> Assign to..

clip_image006

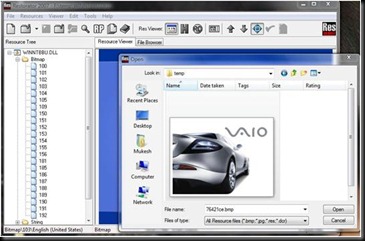
Then Select the bitmap file of your choice like this.

clip_image008

Then click open

clip_image010

Now u can save your file in i386 dir & click install xp to see your new setup screen .

This is the simply way to change the setup screen for more cutomization Use my favourite Tool

WinntbbuED

Winntbbued editor can change text, fonts, images, progress bar colours, animation.


Download Restorator

download

OEM Information & Logo

You can import your customized OEM Information and Logo unattended, we'll show you how in this guide.

To do this, you need to create 2 files - oeminfo.ini and oemlogo.bmp

Open Notepad and Copy and Paste the following example, then edit it accordingly:


[General]

Manufacturer=Mukesh mishra

Model=

[OEMSpecific]

SubModel=

SerialNo=

OEM1=

OEM2=

[Support Information]

Line1=Support Contact: cooljeetu.mukesh@gmail.com


Save it as oeminfo.ini

oemlogo.bmp

Create a new image with a pixel size of 180x114 (width x height), customize your logo to how you would want it to look, then

save it as oemlogo.bmp. Its a good idea to keep it transparent so it blends into the color of the System Properties window!

Copy both files into your Windows System32 Folder (usually C:\Windows\System32\) and open up your System Properties box to

see the changes. Edit your files again until you are happy with it.

Friday, July 24, 2009

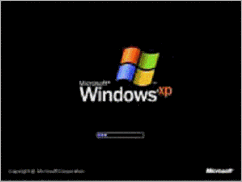
Customizing the Windows XP Boot Screen

 
Every time I turn on my computer, I am forced to stare at the boring
Windows XP boot screen. Although, I must admit, I found the moving
blue bars very amusing at first, after a few months, I became bored and
wanted something different. Although changing the boot screen is not a
feature that the Windows XP team at Microsoft has built into Windows,
doing so is still possible.

clip_image002


The Boot Screen image, is actually a resource located in the Windows

kernel file ntoskrnl.exe. Now comes the complicated part, there are 4 unique kernel files that Windows uses:

ntoskrnl.exe - Windows Single Processor Kernel

ntkrnlmp.exe - Windows Multi Processor Kernel

ntkrnlpa.exe - Windows Single Processor Kernel with more then 3 GB of RAM

ntkrpamp.exe - Windows Multi Processor Kernel with more then 3 GB of RAM


AMD Processors as of the time of this writing, are ALL considered Single Processor systems, where as Intel Pentium 4 processors

WITH Hyperthreading are Multi Processors and all NON Hyperthreaded processors are Single.

Step 1- Preparing to Create the Kernel File

You need a Boot editor

First things first, extract the Boot Editor archive to a folder of your choosing, and attempt to execute. If you get an error about a

missing file, you're most likely needing msvbvm60.zip. Extract both those archives into the same folder as Boot Editor, and you

should be good to go.

Step2-Upon first getting the program running, you'll be confronted with this screen:

clip_image002[8]

Press NO as I'll be telling you want to do. If you're interested in reading it later, it's the readme file in the Boot Editor

directory.

· The next screen will be:

clip_image004

You can safely click CLOSE. It won't harm your system, and you won't screw up any files.

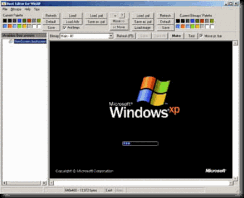
· Welcome to the main screen of Boot Editor. It should be similar to:

clip_image006

Step-3 Click the File menu and select New Boot Screen.

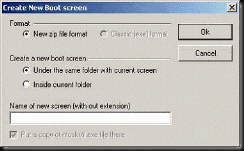
· In This window should appear:

clip_image008

In the box, type in just a name for your bootscreen. This will be the filename that it's saved under.

Now we're going to change the images. The latest version of the Service Pack 3 kernel, has only 4 bitmaps inside, where as

the prior version including Windows 2003's kernel have more. You'll understand what the images go to, as in the dropdown

box are descriptions for each image.

clip_image010

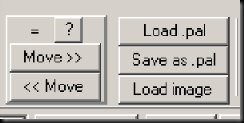
· Once you have selected the image you wish to replace, click the Load Image button at the top

clip_image012

and select YOUR image that you want to replace the original with. When you replace the Main - #1 image, also press the

<< Move button to correct the color pallete of the file.

If say you want to move the progress bar animation, when viewing the Main - #1 image, click and drag the progress bar

image up and down. You CAN NOT move it left or right.

l Let's save this for either distribution online, or incase you want to back it up. Press the Make button located at the top of

the screen.

clip_image014

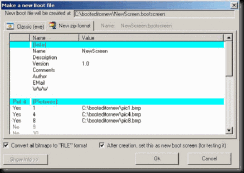
Step 4- The following screen will let your more precisely save the file.

clip_image016

If you want to change the name, double click the name tag, and type.

If you're modifing one of the older kernels which still has all of the different versioning images (Profession, Home,

Server, Media Center, etc.), here is where you can remove them if you wish. This will not cause an error, they just

won't display like they normally would.

Under the column Put In, double click and select No.

Click OK when you're done, then click OK on the confirmation.

The file you just created is really just a zip file that you can upload so others may use your same images. It's saved in your

Boot Editor directory under the name you called it, with the extension bootscreen.

Now boot editor create a boot file (newboot.exe)

clip_image018

Press OK and continue. Press OK on the concluding screen.

Now copy (newboot.exe) to your system32 folder

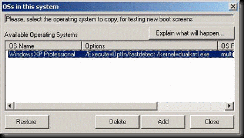
Do some Changes to Boot.ini file remove any readonly attribute to this file

clip_image020

Copy the last line of the file & paste it after

clip_image022

Now at the last line you see /fastdetect

Now add this /Kernel=Newboot.exe

Like this

clip_image024

Now restart your system & select the no-2 operating system to see your new boot screen

Creating Your Own OS

• Customize your windows as you like.

• Creating Addon of Softwares

• Integrating Addons software's.

• Integrating Drivers.

• Intergrading Windows Update.

• Upgrading your windows installation SP1 to SP2 & SP3.

• Testing your OS Virtually.

Windows Customization & Hacking


• Hacking Windows Start menu ,Boot screen , logon screen ,system properties ,windows version ,themes ,screensaver ,windows animation control , system dialogs ,windows Icons & many more..


• Hacking windows Installation
• Creating Un-attended Installation
• Hacking Installation Screen
• Creating Boot menu
• Creating Multiboot Disc
• & lots of stuff.

Selecting tools

Make sure you that you’re using the right tool for the task:

  • To crack passwords, you need a cracking tool such as LC4, John the Ripper, or pwdump.
  • A general port scanner, such as SuperScan, may not crack passwords.

The following list runs down some of my favorite commercial, freeware, and open-source security tools:

  • Nmap
  • Resource hacker
  • Restorator
  • ophcrack
  • Hexa workshop
  • EtherPeek
  • Sysinternals
  • SuperScan
  • QualysGuard
  • WebInspect
  • LC4 (formerly called L0phtcrack)
  • LANguard Network Security Scanner
  • Network Stumbler
  • ToneLoc

Here are some other popular tools:

  • Internet Scanner
  • Ethereal
  • Nessus
  • Nikto
  • Kismet
  • THC-Scan

I discuss about these tool time to time when we need it.

Working ethically

The word ethical in this context can be defined as working with high professional

morals and principles. Whether you’re performing ethical hacking tests

against your own systems or for someone who has hired you, everything you

do as an ethical hacker must be aboveboard and must support the company’s

goals.

The Ethical Hacking Process

    Like practically any IT or security project, ethical hacking needs to be planned

    in advance. Strategic and tactical issues in the ethical hacking process should

    be determined and agreed upon. Planning is important for any amount of

    testing — from a simple password-cracking test to an all-out penetration test

    on a Web application.

    Formulating your plan

    The authorization can be as simple as an internal memo from your boss if

    you’re performing these tests on your own systems. If you’re testing for a

    customer, have a signed contract in place, stating the customer’s support and

    authorization. Get written approval on this sponsorship as soon as possible

    to ensure that none of your time or effort is wasted. This documentation is

    your Get Out of Jail Free card if anyone questions what you’re doing.

    You need a detailed plan, but that doesn’t mean you have to have volumes of

    testing procedures. One slip can crash your systems — not necessarily what

    anyone wants. A well-defined scope includes the following information:

    • Specific systems to be tested

    • Risks that are involved

    • When the tests are performed and your overall timeline

    • How the tests are performed

    • How much knowledge of the systems you have before you start testing

    • What is done when a major vulnerability is discovered

      When selecting systems to test, start with the most critical or vulnerable

      Systems. For instance, you can test computer passwords or attempt socialengineering

      Attacks before drilling down into more detailed systems.